John Blackwood's Rigs
Graham Calderwood's Rig
Renatus Derbidge's Mistletoe Observatory
A Webcam, and Raspberry Pi
We wish to investigate the shapes of buds, exactly. For this, they must be seen – exactly. There must be very many ways this, “seeing”, might be attempted, but none is likely to be ideal.
Pros and contras, particularly of technology and devices newly available, are discussed here.
Lawrence Edwards' Camera Rigs
First Single-Bud Rig (pending.)Bud-Array Projector/Enlarger
For a time, Lawrence gathered first five, then ten, then twenty, buds per day, and using double-sided, clear Sellotape (Scotch tape), stuck them on a glass slide, then placed the slide into a home-made enlarger.
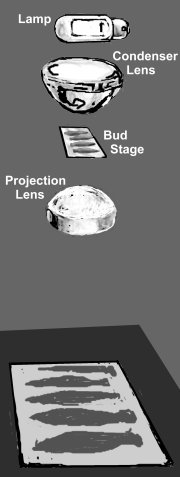
He projected the greatly-enlarged shadows of the buds on to photographic paper, which, when developed, provided him with easily-measured images.
I recall sending him a condenser lens that I had from a broken slide projector, but I never saw the enlarger into which it went. Lawrence said it was, “about the size of a gentleman's wardrobe.”
Should anyone wish to try this, the essential thing to note is that the condenser should focus an image of the light-source on the projection lens that fills the aperture of that lens as exactly as possible. This ensures that nearly all of the light that passes through the condenser also passes through the projection lens.
If the intention is to simply to expose photographic paper, then such light-conservation should mean that a “packed” array of, say, four or five white LEDs will do as a light-source.
The dimensions of the rig depend on the optics of your lenses, obviously. The diagram below shows the basics graphically, and for drafting, this is a good way to do it - good enough for government work, anyway. Draw it out on some graph paper, then scale up..

You can get the focal length, nearly enough, by focusing an image on a wall of some suitably remote thing, then measuring how far the lens is from the wall.
John Blackwood's Camera Rigs
John liked film cameras, and paper prints. He first sent his prints to Lawrence Edwards for measurement and analysis, then latterly to me. I scanned them using an A4 flatbed scanner, then ran them through the Bud Workshop. Come to think of it, I still have a couple of batches to do!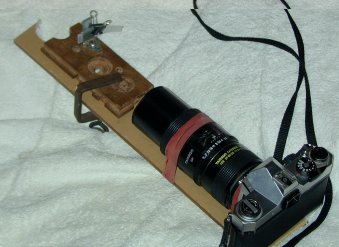
Note the simple method (at C, below) of (1) identifying the bud, (2) providing a background for the bud, and (3) a calibration/focussing graticule for the bud, all at the same time. He pre-printed the IDs, ticker-tape fashion, and just fed them through day by day. The graticule was a piece of 2mm grid graph paper. Ingenious!
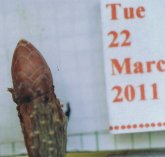
I remember asking him to take the graticule from behind the bud, as it interfered with the Bud Workshop's profile-finding operation. His solution was simply to partly-cover the graticule with tracing paper, which did the trick, but left the graticule showing through faintly just in case it was needed for something else, as you can see in the example below right, of an Oak bud in Sydney. Ingenious again!
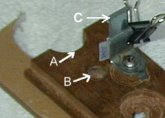
The holes at A and B accommodated large and small buds. I see that he used the same sort of interlocking laminated wood-fibre floorboards that I do. They are much easier to fashion precisely than native wood.
As it happened, this particular rig was stolen from John's car. He soon had it replaced with something similar, and improved: it had a beautifully fashioned pistol grip—which is what inspired my design on the right. I'm sorry that I don't seem to have a picture of it.
John did not use artificial light: he could rely on Sydney's fairly constant weather conditions, and always snapped the bud around noon, when the sun was about overhead, so he avoided shadows and gloom for the most part. This would never work in the North East of Scotland.
He said it was his habit, in order to mark his stance, to kick a couple of discrete toe-holes in the turf below the tree on taking the first picture of a series, then to put his feet in them on all subsequent days—which largely took care of the aspect problem. Ingenious yet again!
Eventually, John scanned his prints himself, and sent me the resulting files attached to emails. This obviously eliminated the (significant) expense of mailing prints from Oz, and the time it took for them to arrive. More importantly, the prints remained with John, properly in his archive.
John Blackwood was one of our best field workers, and a lovely man. I'm truly sorry he's gone.
A Webcam, and Raspberry Pi
(preliminary notes)This is a sketch of the “innards” of a webcam of mine, showing the approximate dimensions.
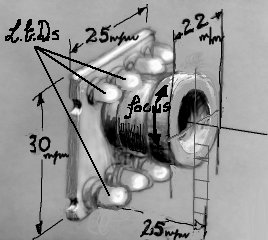
Its “outtards” (i.e., its case and stand) were, compared to the module, huge, awkward, and not at all adaptable, so I did away with them. I will be enclosing the module in an easily-mountable, waterproof box.
Of course, webcams differ. Most do not have LEDs built-in, I think. This one is described here simply because I have it! I hope, by detailing it, to supply a general sense of what might confront anyone wanting to use a webcam for bud photography.
The LEDs, as originally supplied, are set back behind the flange of the lens barrel, which is a bit daft, as it creates a shadow just where we want light, that is, some 30 to 40 mm in front of the lens, so they will need to be repositioned (focussing at 30 to 40 mm gives a field-of-view about 20 mm wide – a little more than 3/4 inch – which will do for most buds).
The LEDs are not software controlled, so that's to be sorted out, too.
The webcam is controlled via USB and a Raspberry pi. I have installed fswebcam on both my RPIs (one is an older, 1st rev. unit, the other is the latest PI 2.0. Both run Raspbian Linux), and they work fine—one of them took the snap of the pencil-sketch shown above, using the webcam at a resolution of 640 x 480 pixels, though I admit I've since doctored that image a bit! The undoctored (but reduced) shot is below.
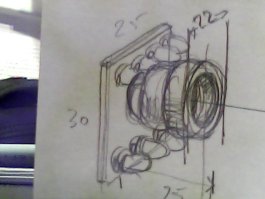
I have yet to program the RPi to take pictures on a schedule, automatically. This will probably be managed via cron. The webcam can be triggered manually, both directly, and wirelessly from another computer. Stand by for details!
Stop Press.
Here, from Howard Pautz in Florida, is a very useful link about using the Raspberry pi's camera-module.
http://randomnerdtutorials.com/guide-to-raspberry-pi-camera-v2-module/
Thanks, Howard!
Graham Calderwood's Pistol Camera Rig
The camera is a Ricoh Caplio R6.
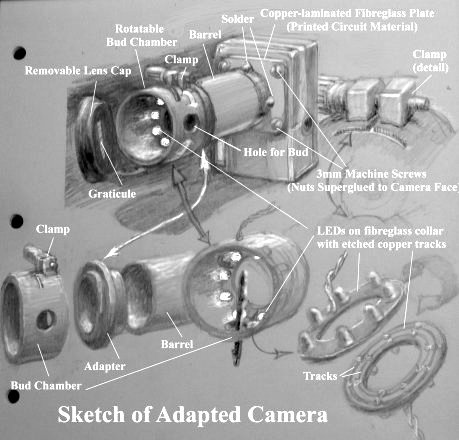
I am the happy owner of an
ancient, model-maker's lathe, which considerably eases the task of adapting cameras!
The sketch above is fairly self-explanatory, I hope, but I
see that I have not indicated how the barrel (fashioned from a discarded aluminium beer-can) is soldered to the face-plate.
Solder does not “take” to aluminium, so I have wrapped the sort of adhesive copper tape
that is used in the making of stained-glass windows around the end of the barrel, and soldered that, with the barrel, to the face-plate. The tape has a
width of about 1/4 inch: I had it from my daughter, who teaches fine-art
metalwork, but I'm sure it can be found on the web.
You need not do it this way, of course. The
face-plate could be plastic, or aluminium sheet, and carpenter's hot glue
could be used instead of solder. If you can cut thread on a lathe, you
could have the barrel screw into the face-plate.
The barrel need not be a beer can: it could be more of the
PVC pipe used for the bud chamber, but there should be a means to rotate the
chamber around the lens axis, and to clamp it in place, so an adapter will
likely still be needed. I have shown one sort of
clamp, but it could be a knurled-head screw - or a hose-clip!
If you are like me, you will work with whatever is to hand.
I find the Lens–or Chamber–Cap essential. It is very hard to standardise
bud-lighting without it.
It should be covered, on its inward facing surface, with black velvet, for
contrast. Indeed, it is a good idea to line the barrel and the chamber with black velvet, too, as this reduces light scatter and enhances contrast
generally.
I imagine that a, “NeoPixel”, LED ring might serve in place of the LED ring shown, but I gather such rings require microprocessors to run them!
Here is the (partly adapted) camera mounted on its pistol-grip ...
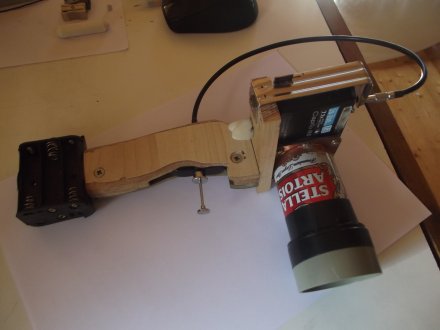
... and equipped with a shutter-release cable, arranged to be operated like a real pistol's trigger. The business-end of the cable is screwed into a 4mm brass nut superglued to the
fluted bracket, which is screwed to the camera platform.
The battery-pack for the LED ring is attached to the bottom of the pistol-grip. The cable-release also actuates a micro-switch, which turns on the LEDs, before it depresses the shutter to take a picture.
So the LEDs are on only when, and for as long as, they are needed. (This also allows you to ‘compose’ a shot using the camera's display when the shutter-button is half-depressed for autofocussing.)
I have the LEDs on a home-etched printed circuit, but they could just as well, and rather more easily, be arranged around a stiff cardboard collar, as they don't emit much heat.
The idea is that one just points, and clicks!
It should be clear which Belgian brewer supplied the barrel.
Renatus Derbidge's Automated Mistletoe Observatory
Renatus Derbidge investigates the change with time of the form of the Mistletoe berry, Viscum album, in relation to its efficacy as a remedy for cancer (“Iscador”), at Arlesheim, Switzerland. He first used my Bud Workshop program for this work, then he developed his own version, better-adapted to the specific needs of his research.
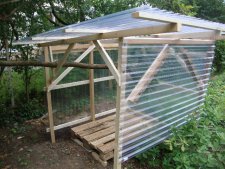
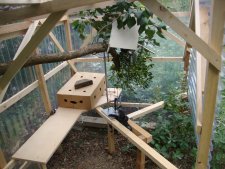
There is a fallen-but-still-living bough in Arlesheim, adorned with a large clump of Mistletoe. Renatus has built a hut around it! In the hut, he has set up a digital camera, controlled by a laptop, to take pictures at intervals of a Mistletoe berry.
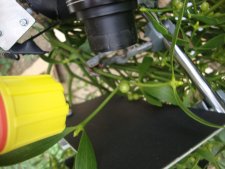
The laptop is in the upturned, weighted fruit-box seen in the top-right image, below. The arrangement of the source of illumination, backround plate and camera trained on the berry, is shown in the bottom-left image, and a sample is shown in the bottom-right image.
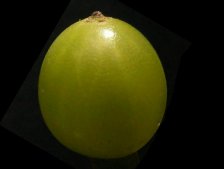
Mistletoe berries are not buds, but like buds, they have accurate path-curve profiles.